Unisub Easel Installation
0 seconds
N/A°F (-18°C)
Light
OUR INSTRUCTIONS ARE BASED ON USING A DK20S, DK3110 AND/OR A COUNTER TOP CONVECTION OVEN. TIMES AND TEMPERATURES WILL VARY DEPENDING ON WHICH EQUIPMENT YOU USE.
Detailed Instructions
| Substrate | U4058, U4060, U4084, U4084-01, U4219, U4220 |
|---|---|
| Temperature | N/A°F (-18°C) |
| Prepress | . |
| Time (min:sec) | : |
| Pressure | Light |
| Additional | |
| Recommended Paper | . |
| Heat Press Instructions |
Hover transfer under open heat press for 10 seconds to dry excess moisture. 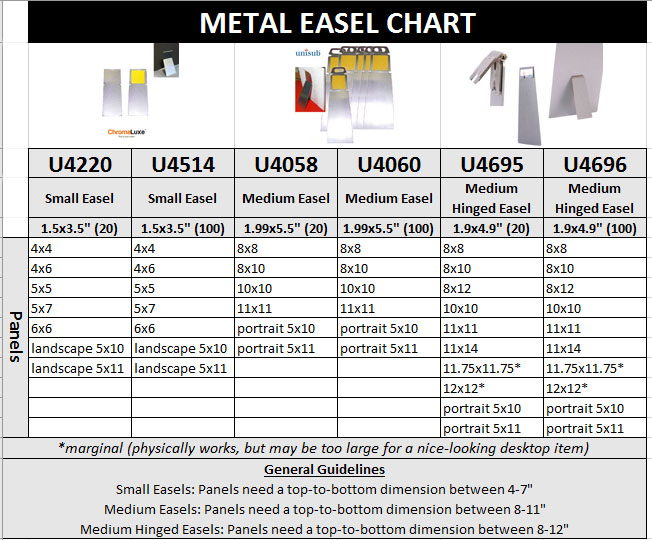 1. Before affixing the easel to the photo panel it should be incrementally bent along the scoring line adjacent to the easel’s leg. So, bend a little, then model against the back of the photo panel to see if the display angle is what it should be. Be aware that if you bend the leg out too far, you may not be able to reposition it without it snapping off of the adhesive base. The easel can tolerate bending up to a 90 degree angle. However, it has a lower tolerance for bending forward toward the photo panel after it has been bent backward from the photo panel. 2. Once the easel has been bent to the desired angle, remove the protective strip from the adhesive and affix it to the photo panel. Apply firm pressure to the easel within the area of contact with the photo panel. If possible, avoid putting stress on the easel for a few hours after application. |
Pressure Cheat Sheet
Contact Level
PSI
Press Dial Level
Average Human Resistance Felt
Contact Pressure
10-15 psi
1 on press dial
where the platen just makes physical contact with product
Light Pressure
20 psi
2 on press dial
resistant with one arm pressing down, easy with two arms
Medium Pressure
40-60 psi
3-5 on press dial
resistant with two arms pressing down, doesn’t require usage of shoulders
Heavy Pressure
80 psi
6 and up on dial
very resistant with two arms pressing down, requires lifting of elbows and shoulders to lock in place